Sourdough Shaggy Dough
Ever stared at a bowl of what seems more like a wet, unruly mess than the promise of a perfect loaf? That, my friends, is the captivating, sometimes frustrating, but ultimately rewarding world of shaggy dough.
The term "shaggy dough" might sound like a culinary riddle, yet it represents a crucial juncture in many baking processes, particularly when crafting breads and pastries. It signifies the stage where the ingredients have just begun to commingle, forming a rough, sticky, and seemingly chaotic mass. This initial state, far from being a sign of failure, is a vital step toward developing the gluten network, the structural backbone of a well-risen loaf or a tender, flaky crust. Whether you're a seasoned baker or a kitchen novice, understanding the nuances of shaggy dough can transform your baking endeavors.
Heres a table summarizing key aspects related to the concept:
| Aspect | Description |
|---|---|
| Definition | The initial stage of dough mixing where ingredients are combined, forming a rough, sticky mass. |
| Significance | Precedes gluten development, essential for structure in bread and pastries. |
| Common in | Bread making, particularly sourdough and some pie crusts. |
| Appearance | Rough, wet, lumpy, and stringy. |
| Handling | Often involves resting periods (autolyse) and techniques like stretch and folds. |
| Purpose | To allow hydration and begin gluten development. |
| Common Ingredients | Flour, water, starter (for sourdough), salt, and sometimes other fats (butter, oil). |
| Troubleshooting | Often relies on patience and understanding of hydration levels; adjustments may be needed. |
| Techniques to Use | Stretch & Folds, Coil Folds, autolyse |
The dough for this sourdough peasant bread comes together fast, and because the dough is much wetter than traditional bread dough, it can easily be mixed by hand. This wet and shaggy dough is the hallmark of a certain style of bread making, a testament to the power of hydration and patience.
Let's delve deeper into the process, starting with a basic scenario. Imagine, if you will, the creation of a sourdough loaf. Step 1: mix the dough. This is simply mixing your water, sourdough starter, salt, and flour in a bowl, mixing into a shaggy dough. The goal at this point isn't to achieve a smooth, elastic consistency; it's merely to incorporate the ingredients. The dough will be loose and shaggy at this point. You might be tempted to add more flour, but resist the urge. This shaggy, almost unruly appearance is exactly what we're aiming for initially.
Next comes the crucial stage: stretch and folds and bulk fermentation. You will complete 4 sets of stretch and folds during your bulk fermentation period. After an hour of pre-mix and autolyse that included the leavain, let the dough rest for 30 minutes, then perform one more round of coil folds. The autolyse process, which involves mixing the flour and water and letting it rest, allows the flour to fully hydrate, which helps to develop the gluten. During the bulk fermentation, the dough needs to be let to rise, covered, in a warm room until it doubles in size. It should spring back slightly when pressed. The stretch and folds technique is a simple yet effective method of strengthening the dough. The goal is to redistribute the yeast, develop gluten, and trap air within the dough. Transfer the dough onto a lightly floured surface and gently stretch it into a square. Fold the right and left sides. After the bulk fermentation, shape the dough into a tight ball, creating tension on the surface to hold its shape. Remove the dough from the fridge, score it and place it into a hot oven for baking.
Consider a specific recipe using: 900g bread flour, 100g whole wheat flour, 20g salt, 820g water ~85F, 225g leavin (young levain) that has undergone a 1hr autolyse which included the leavain. We might also work with a final dough composition of 302g white AP flour and 138g whole wheat flour. I made sourdough bread dough saturday morning without a real recipe (400 g bf, 50 g each ww and rye) and about 400 g of water and between 100 and 200 g starter, a tablespoon of salt and sugar. I lost track, wasnt paying attention. This is the beauty of baking: it demands our attention, and in return, it teaches us patience.
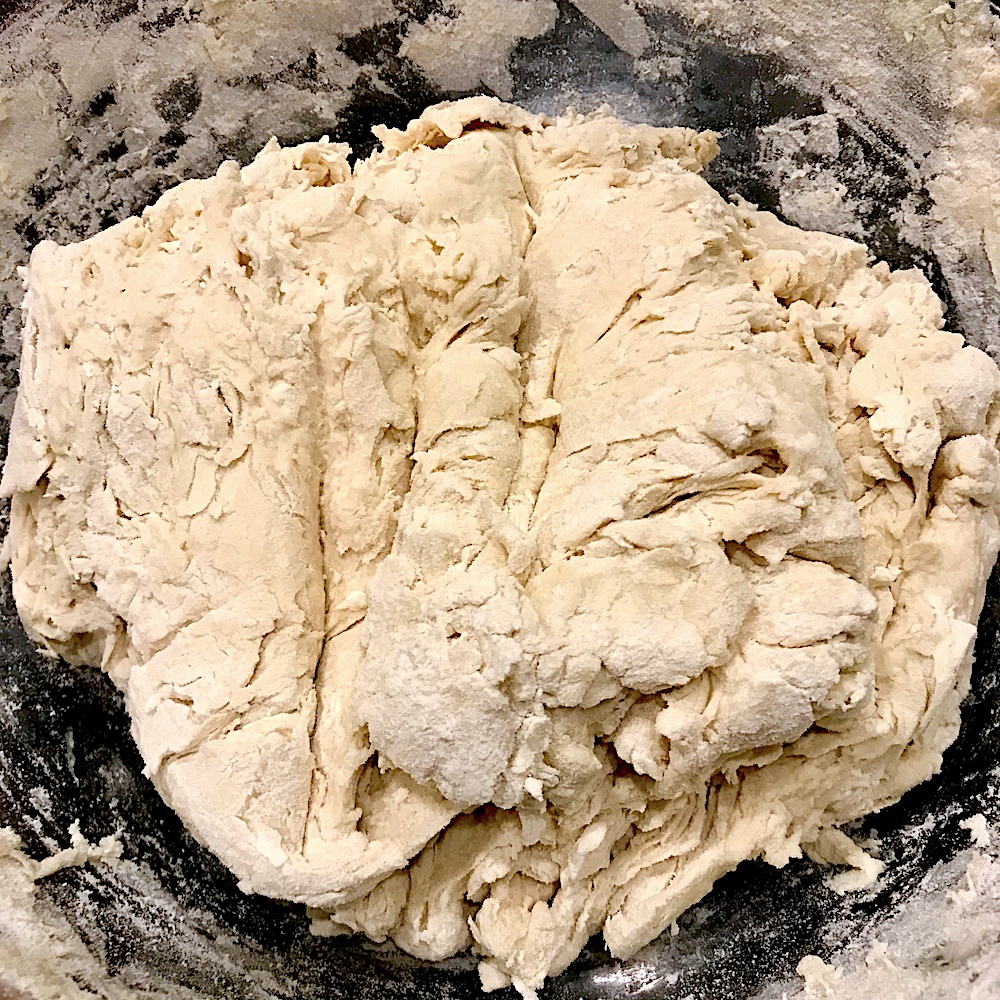
Many bakers have experienced the feeling that their dough looks shaggy after 6 sets of stretch and folds. She definitely has some structure (this picture was taken before the last set), but still looking rather wet, lumpy, and stringy. This is not necessarily a sign of a problem; its just the nature of some doughs. It highlights the importance of understanding how each recipe has unique characteristics.
In the realm of baking, understanding "shaggy dough" is fundamental. Shaggy dough is the initial stage of dough mixing, where the ingredients have just combined, forming a rough and sticky mass. This stage is pivotal in the baking process, particularly in bread making, as it precedes the development of a gluten network essential for structure and texture. This initial stage, far from being a sign of failure, is a vital step toward developing the gluten network, the structural backbone of a well-risen loaf or a tender, flaky crust.
Advanced techniques for handling shaggy dough are plentiful. One way to enhance the flavor and texture of your bread is by using preferments (such as poolish or biga) or sourdough starters. These methods involve preparing a portion of the dough, allowing it to ferment, and then incorporating it into the final dough. This adds complexity to the flavor and improves the dough's structure. Another popular method is the autolyse, where you mix the flour and water and let it rest, letting the flour fully hydrate and begin the gluten development process. You will complete 4 sets of stretch and folds during your bulk fermentation period, and let the dough rise, covered, in a warm room until it doubles in size.
After grasping the science behind shaggy dough, the next logical step is troubleshooting. Transforming that frustrating shaggy mass into a workable, smooth dough isnt an arcane skill its about precision, understanding, and sometimes, a little bit of intuition. For instance, if your dough feels too wet, you can adjust the hydration levels by adding a small amount of flour, kneading gently until incorporated. If the dough seems too dry, adding a splash of water can help bring it to the right consistency. When a pie dough recipe (like mine) calls for kneading everything into a shaggy dough, aim for something like this.
How to make soft sourdough sandwich bread step 1: In a large mixing bowl, whisk together 150g active sourdough starter, 325g warm filtered water, 20g avocado oil (or cooled melted butter/olive oil), and 25g honey until combined. Stir in 500g unbleached flour and 10g salt until a shaggy dough forms. Cover and let it rest for 1 hour. This recipe illustrates how a shaggy dough is the expected outcome, the desired result. How to make sourdough pie crust step 1: Make a shaggy sourdough pie dough. In a large bowl, whisk together the flour and salt. Grate frozen butter with a box grater and toss it directly onto the flour mixture, mixing it up as you go. This recipe also uses the shaggy dough as the starting point.
One way to enhance the flavor and texture of your bread is by using preferments (such as poolish or biga) or sourdough starters. These methods involve preparing a portion of the dough, allowing it to ferment, and then incorporating it into the final dough. This adds complexity to the flavor and improves the dough's structure. Another popular method is the autolyse, where you mix the flour and water and let it rest, letting the flour fully hydrate and begin the gluten development process. You will complete 4 sets of stretch and folds during your bulk fermentation period, and let the dough rise, covered, in a warm room until it doubles in size. It should spring back slightly when pressed.
In conclusion, the journey with shaggy dough is a voyage of discovery. It demands patience, a keen eye, and a willingness to embrace the unexpected. The more you understand the role of shaggy dough, the more confident and skilled you'll become in the art of baking. So, the next time you encounter a bowl of what seems like a mess, remember that it's the beginning of something wonderful. Embrace the shagginess, and let the magic of transformation unfold.