DIY Igloo Build: Step-by-Step Guide & Tips | [Your Site]
Could building a structure from snow, a material often associated with fragility, actually result in something remarkably robust and enduring? The construction of an igloo, a testament to human ingenuity, proves that it can.
The allure of the igloo, an architectural marvel crafted from the very elements of winter, extends far beyond its practical function as a shelter. It embodies a spirit of resourcefulness and a deep understanding of natural principles. From the frigid landscapes of the Arctic to the slopes of the mountains, the art of igloo construction has captivated the imagination for centuries. But how does one actually build an igloo? The process, while seemingly simple in concept, requires a blend of skill, patience, and a respect for the properties of snow. One might find it takes a few attempts, even with the assistance of diagrams and instructional videos.
Building a geodesic dome igloo, or even a standard igloo, can be a rewarding experience. Consider the following bio data for building a dome igloo:
| Feature | Details |
|---|---|
| Project Type | DIY Shelter/Greenhouse/Recreational Structure |
| Materials Required | Compact, solid snow; or PVC pipes and zip ties for a geodesic dome |
| Tools Required | Measuring tape, shovel (for snow), ladder (for taller domes), icebox mold (optional) |
| Construction Time (Traditional Igloo) | Typically 10-15 hours |
| Construction Time (Geodesic Dome) | Under 2 hours (as advertised in some kits) |
| Team Size (Optimal) | 3 or more people for efficiency |
| Load Bearing Capacity | Up to 700 lb (as reported by some DIY igloo makers) |
| Reusability | Geodesic dome hardware (mesh, rods) can be reused |
| Durability | Igloos can last for several weeks in the open, and are strengthened by subsequent snowfall. |
| Suitable Location (Traditional) | Area with compact, solid snow, at least 2 feet deep |
| Suitable Location (Geodesic) | Any suitable outdoor site |
| Additional Considerations | Ventilation, selecting the right location, measurements. |
| Reference Website | Example Igloo Guide (Replace with a relevant, authentic website) |
The initial step towards mastering the craft of building an igloo lies in selecting the appropriate location. The ideal site is one where the snow is compact and solid. This type of snow holds its shape far better than the fresh, powdery variety, which makes the construction process significantly smoother. The snow should ideally be at least two feet deep to allow for the creation of the blocks necessary for the igloo's walls. If you're looking for a geodesic dome option, a level surface is crucial.
For those opting for the classic approach, the process begins with drawing a circular outline in the snow. This will dictate the size and shape of the igloo. From within this circle, the builder then cuts out blocks of snow, shaping them to fit the curve of the structure. It is often the case that the use of a specialized icebox mold will aid in shaping bricks in a circular sequence.
Building an igloo is a fascinating process that showcases human ingenuity and the practicality of snow as a building material. Whether youre planning an adventurous camping trip or simply want to try something new, constructing an igloo is a rewarding experience. Some guides emphasize that, even with a diagram to assist, the building phase can be tricky, especially if the structure is to be built from the top down. Several builders mention that constructing an igloo from the bottom up can be done, though this usually requires the use of a ladder for assistance. In some cases, it may even take at least three people to set up the dome efficiently.
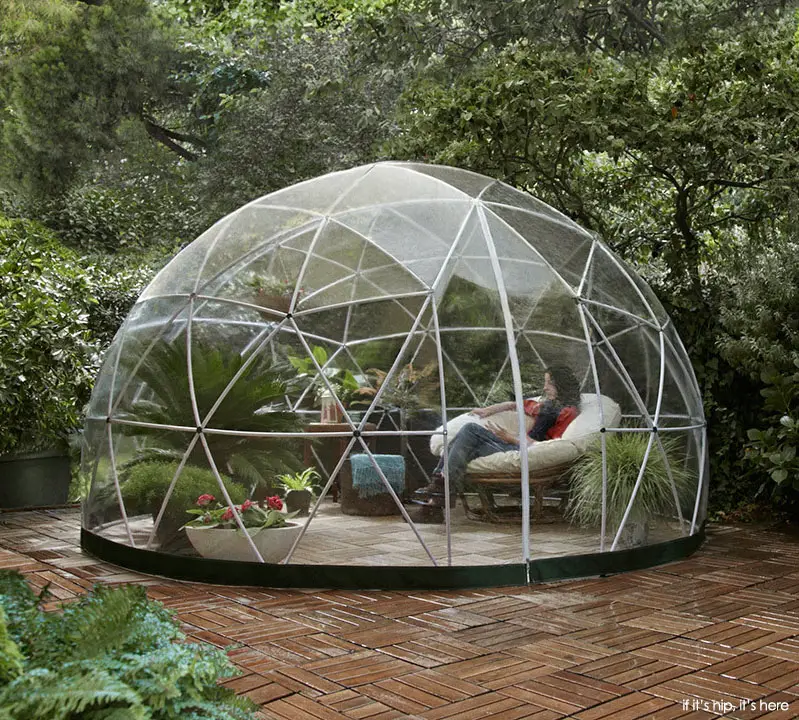
Alternatively, those interested in a less labor-intensive method might explore the option of geodesic dome kits. These kits often involve PVC pipes and zip ties. Some kits are marketed as being easy to build in under 2 hours. These kits are adaptable, and the connector parts are designed to support bamboo cane, but timber, plastic or metal tubes can also be used. These can then be used as a shelter, greenhouse, jungle gym, and more. If you are looking for something a bit different, you may be interested in one of our geodesic garden igloo dome bubble tent. Not only do they look super cool, but theyre like an instant conservatory in your garden! Easy to ventilate in the day and great for some stargazing on a summers evening. Other options include inflatable igloo dome tents, which are often used for events. Such options, including PVC cover garden dome igloos with LED lights, are also on the market.
For those who choose the traditional method, the process of building an igloo takes time. It would take around 10 to 15 hours to create an igloo. However, even though building an igloo takes longer than setting up a winter tent, it lasts much longer too. An igloo built out in the open can last for several weeks. Furthermore, the igloo gets stronger and thicker form the new layers of snow. Some builders even say that igloos made with the icebox igloo maker are strong enough to support the weight of three people!
With every little thing in place, you can start developing your garden igloo DIY project. Gather the required tools you require to set up, such as ladders for garden igloo measurements over 4 meters, and a measuring tape for exact measurements. The makers of this DIY igloo mention that on completion, the igloos exterior would be able to withstand up to 700 lb of load without collapsing. Since the mesh, rods, and other dome hardware are reusable, you can create igloos as often as you like.
For those taking a do-it-yourself route, it can be very handy to find and save ideas about pvc igloo DIY on pinterest. Another simple step is to assemble and adjust the length of the pole accordingly. Shovel and pack snow into the icebox mold to build a short ramp over the first few blocks. After the ramp, fill the mold full for the rest of the igloo build. Continue shaping the bricks as you build up to retain the curvature of the igloo. Start much the same way as for a normal igloo.
The beauty of this age-old practice lies not only in its functionality, but also in the unique experience it provides. A testament to the ability of humans to not only survive but thrive in challenging environments. The skill, attention to detail, and appreciation for the environment involved in building an igloo creates an experience that is both enriching and enduring. Building a stable igloo starts with selecting the right location. The seven steps to build an igloo involve selecting the right location, finding compact and solid snow. Then draw the circular outline of your igloo in the snow and start cutting out blocks of snow from inside the circle.