Control Raspberry Pi Via Web Browser: Your Ultimate Guide To Remote Access
Imagine this: You're chilling on your couch with your laptop, sipping coffee, and you want to control your Raspberry Pi without leaving the comfort of your spot. Sounds like a dream, right? Well, it's not a dream anymore. Controlling your Raspberry Pi via web browser is not only possible but also super easy if you know the right steps. In this guide, we'll walk you through everything you need to know to make it happen. From setting up your Pi to troubleshooting common issues, we’ve got you covered.
Let’s face it, the Raspberry Pi is one of the most versatile gadgets out there. It can be your personal server, a media center, or even a smart home hub. But what if you could control all these functions from any web browser? Whether you're at home or miles away, having remote access to your Pi opens up a world of possibilities. This guide will help you set it up step by step, so you can start controlling your Raspberry Pi from anywhere.
Now, before we dive into the nitty-gritty, let’s make sure we’re on the same page. Controlling your Raspberry Pi via web browser isn’t just about convenience; it’s about efficiency and flexibility. Whether you’re a tech enthusiast or a beginner, this guide will break down the process into easy-to-follow steps. So grab your Pi, your laptop, and let’s get started!
Why Control Raspberry Pi via Web Browser?
Before we jump into the how-to, let’s talk about why you’d want to control your Raspberry Pi via web browser in the first place. Honestly, it’s all about accessibility and convenience. Imagine being able to check on your home security system, update your personal server, or tweak your smart home settings without needing to physically access your Pi. Sounds pretty sweet, huh?
Here are a few reasons why controlling your Pi via web browser is a game-changer:
- Access your Pi from anywhere with an internet connection.
- No need for additional software or apps—just use your favorite browser.
- Perfect for managing multiple Pi projects remotely.
- Easy to integrate with other web-based tools and services.
So, whether you’re a tech pro or just starting out, controlling your Raspberry Pi via web browser gives you the freedom to manage your projects from wherever you are. Now, let’s dive into the setup!
Setting Up Your Raspberry Pi for Web Access
The first step in controlling your Raspberry Pi via web browser is setting it up correctly. Don’t worry; it’s not as complicated as it sounds. All you need is a Raspberry Pi, a power supply, and a reliable internet connection. Let’s break it down step by step.
Step 1: Install Raspbian OS
Your Raspberry Pi needs an operating system to function, and Raspbian is the go-to choice for most users. Download the latest version of Raspbian from the official Raspberry Pi website and flash it onto your SD card using a tool like Etcher. Once that’s done, insert the SD card into your Pi and boot it up.
Step 2: Configure Your Pi
After booting up, you’ll need to configure your Pi. Head over to the terminal and type:
sudo raspi-config
This will open the configuration menu where you can set up your Wi-Fi, change the password, and enable SSH. SSH is crucial for remote access, so make sure it’s enabled.
Step 3: Install a Web Server
To control your Pi via web browser, you’ll need a web server. Apache is a popular choice, and it’s easy to install. Just run the following command in your terminal:
sudo apt-get install apache2
Once installed, you can test it by opening a browser and typing your Pi’s IP address. If everything’s set up correctly, you should see the default Apache page.
Understanding the Basics of Web Control
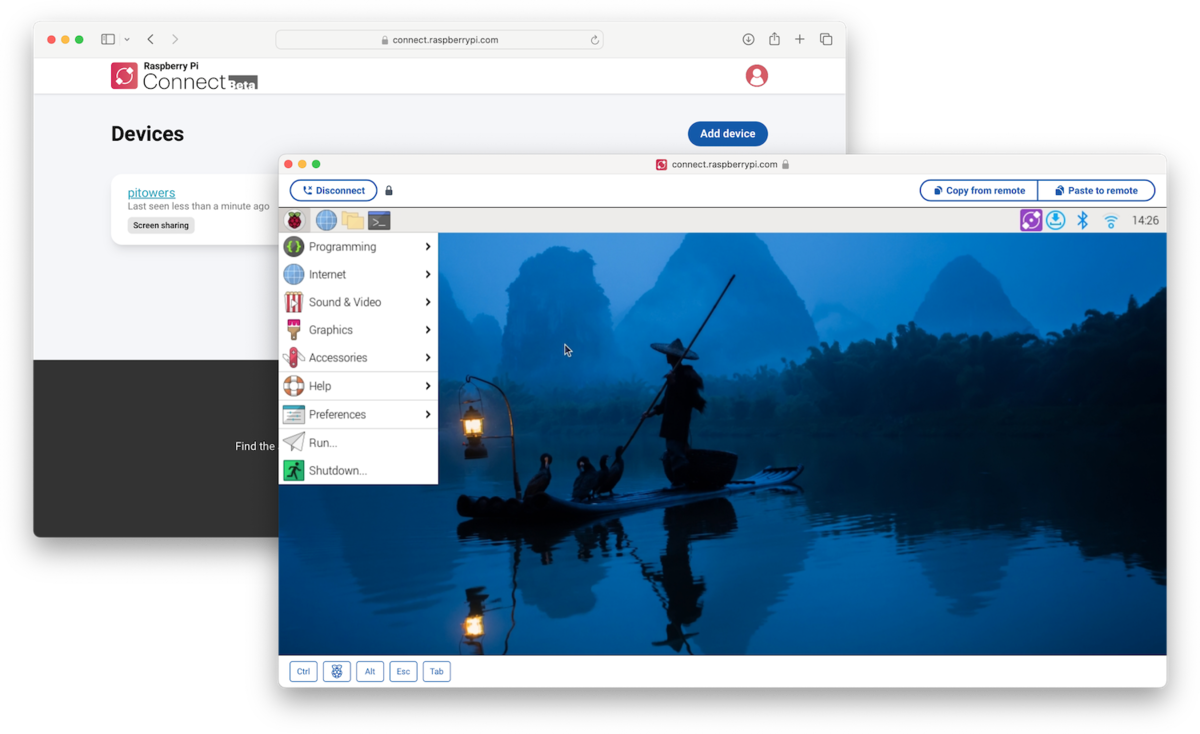
Now that your Pi is set up, let’s talk about how web control actually works. When you control your Raspberry Pi via web browser, you’re essentially sending commands to your Pi through a web interface. This interface can be as simple as a text-based command line or as advanced as a full-fledged dashboard with buttons and sliders.
Here’s how it typically works:
- Your Pi runs a web server that listens for incoming requests.
- When you access the Pi’s IP address in your browser, the web server responds by sending a webpage.
- You interact with the webpage, which sends commands back to the Pi.
- The Pi executes the commands and sends the results back to your browser.
Simple, right? But don’t let the simplicity fool you—this setup can handle some pretty complex tasks. From controlling GPIO pins to managing entire home automation systems, the possibilities are endless.
Choosing the Right Tools
When it comes to controlling your Raspberry Pi via web browser, having the right tools can make all the difference. Here are a few tools and frameworks you might want to consider:
Node-RED
Node-RED is a popular visual programming tool that makes it easy to create web-based interfaces for your Raspberry Pi. With Node-RED, you can drag and drop nodes to create workflows that control your Pi’s functions. It’s perfect for beginners and advanced users alike.
Flask
Flask is a lightweight web framework for Python that’s great for building custom web interfaces. If you’re comfortable with Python, Flask can help you create a tailored web control system for your Pi. Plus, it’s highly customizable, so you can add as many features as you want.
PHP and HTML
If you prefer a more traditional approach, you can use PHP and HTML to create a web interface for your Pi. This method gives you complete control over the design and functionality of your interface, but it requires more coding knowledge.
Securing Your Raspberry Pi
Security is a top priority when controlling your Raspberry Pi via web browser. After all, you don’t want some random hacker gaining access to your Pi and messing with your projects. Here are a few tips to keep your Pi secure:
- Use strong passwords and enable two-factor authentication.
- Disable unnecessary services and close unused ports.
- Keep your software up to date to protect against vulnerabilities.
- Consider using a firewall to restrict access to your Pi.
By following these best practices, you can ensure that your Pi remains safe and secure, even when accessed remotely via web browser.
Advanced Features for Web Control
Once you’ve got the basics down, you can start exploring some advanced features to take your web control setup to the next level. Here are a few ideas:
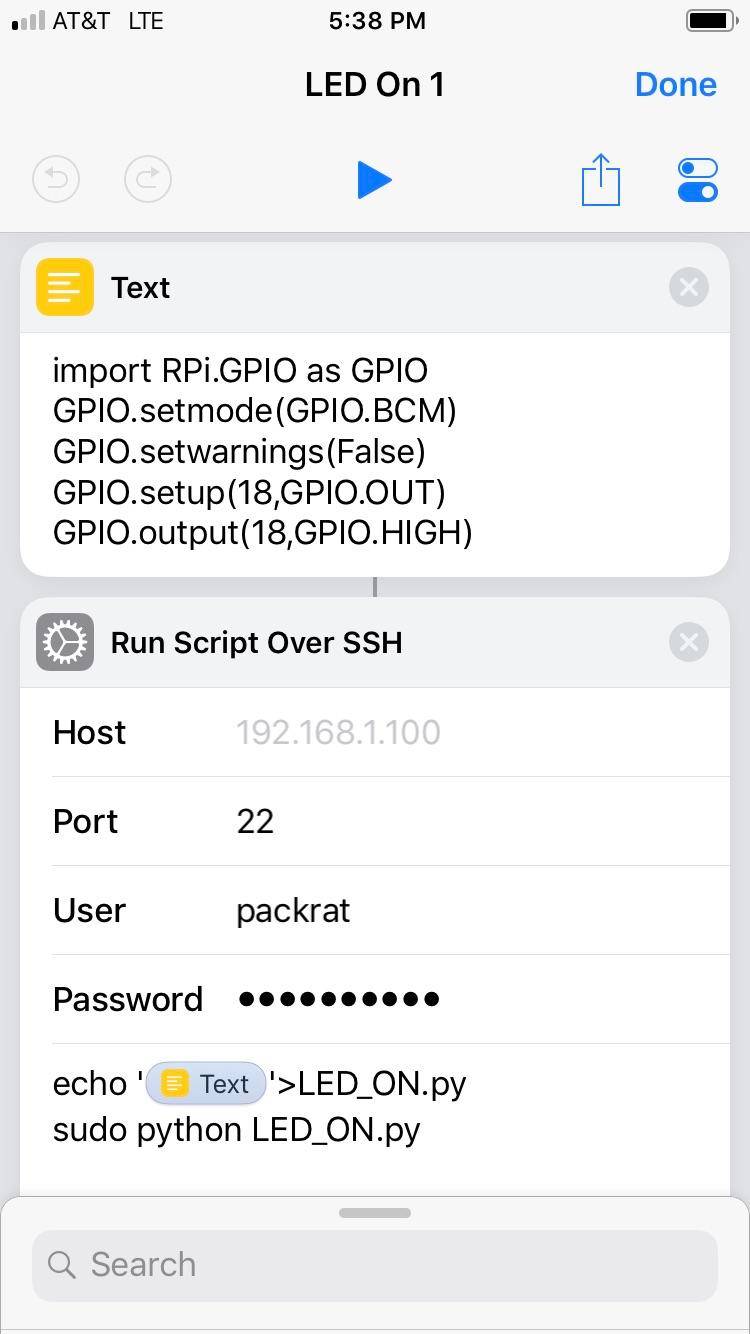
GPIO Control
One of the coolest things you can do with your Raspberry Pi is control its GPIO pins via web browser. This allows you to turn on lights, open doors, or trigger other devices remotely. With the right setup, you can even create a dashboard with buttons for each GPIO pin.
Webcam Integration
If you’ve got a webcam connected to your Pi, you can stream live video to your web browser. This is perfect for setting up a home security system or monitoring your projects from afar. Just make sure to secure your video stream to prevent unauthorized access.
Data Logging
Use your Pi to log data from sensors and display it in real-time on your web interface. Whether you’re monitoring temperature, humidity, or air quality, this feature can provide valuable insights into your environment.
Troubleshooting Common Issues
Even with the best setup, things can go wrong sometimes. Here are a few common issues you might encounter when controlling your Raspberry Pi via web browser and how to fix them:
Can’t Access the Web Interface
If you can’t access your Pi’s web interface, check the following:
- Make sure your Pi is connected to the internet.
- Verify that the web server is running.
- Check your firewall settings to ensure they’re not blocking access.
Slow Response Times
Slow response times can be frustrating, but they’re usually caused by one of these issues:
- Overloaded network—try reducing the number of devices on your network.
- Insufficient resources on your Pi—consider upgrading your hardware.
- Outdated software—make sure everything’s up to date.
By addressing these issues, you can improve the performance of your web control setup.
Real-World Applications
Now that you know how to control your Raspberry Pi via web browser, let’s talk about some real-world applications. Here are a few ideas to inspire you:
- Home Automation: Control your lights, thermostat, and other smart devices from anywhere.
- Remote Monitoring: Keep an eye on your projects with live video streams and sensor data.
- Personal Server: Manage your files and backups without needing to physically access your Pi.
These are just a few examples, but the possibilities are endless. With a little creativity, you can use your Raspberry Pi to solve real-world problems and make your life easier.
Conclusion
Controlling your Raspberry Pi via web browser is a powerful tool that opens up a world of possibilities. From remote access to advanced features like GPIO control and webcam integration, this setup can help you manage your projects more efficiently and effectively. By following the steps in this guide, you can set up your Pi for web access and start exploring all the amazing things you can do with it.
So what are you waiting for? Grab your Raspberry Pi, set it up, and start controlling it from anywhere. And don’t forget to share your experiences and creations with the community. The more we share, the more we grow!
Table of Contents
- Why Control Raspberry Pi via Web Browser?
- Setting Up Your Raspberry Pi for Web Access
- Understanding the Basics of Web Control
- Choosing the Right Tools
- Securing Your Raspberry Pi
- Advanced Features for Web Control
- Troubleshooting Common Issues
- Real-World Applications
- Conclusion